Part 4 · Comfort, Lighting & Your Truck
Lights (aux/off-road lighting)
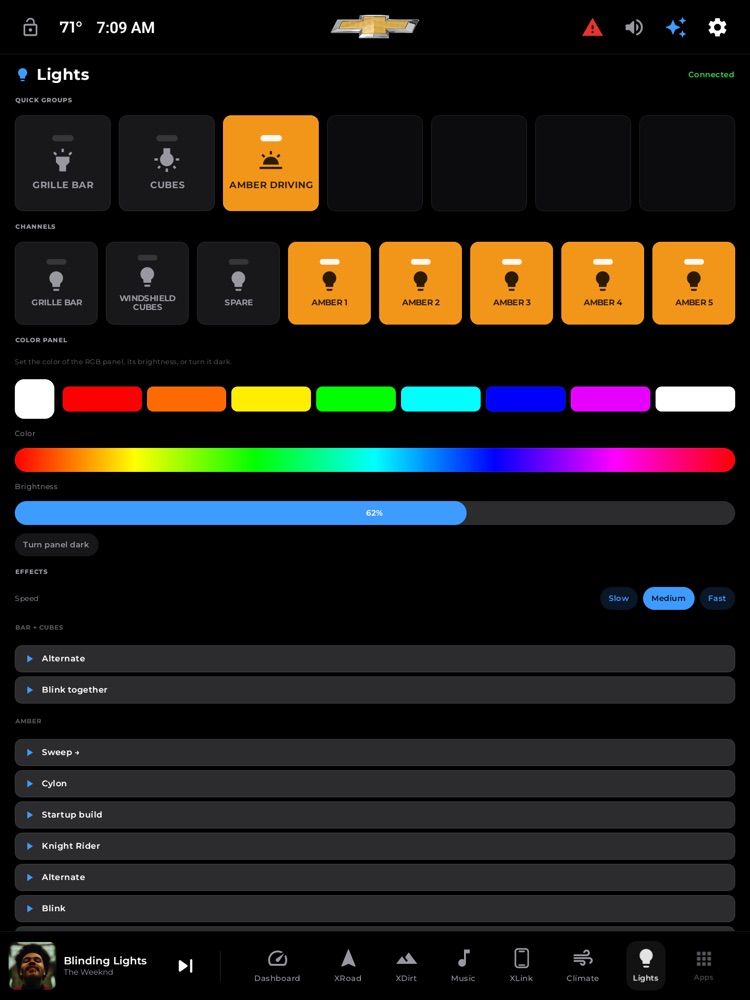
The Lights page: quick groups, per-channel toggles, the color panel, and effects.
The Lights page turns your 15.6" screen into a full off-road switch panel for your aftermarket auxiliary lighting — light bar, ditch/rock pods, and amber driving lights — with big glove-friendly rockers, an RGB color mixer, and animated light shows. It talks to a supported Bluetooth light controller (an AuxBeam-style panel), so everything you flip here lights up the truck for real.
Where to find it: Bottom dock › Lights tab (the lightbulb icon). Quick, everyday controls for the same lights also live right on your Dashboard.
When you'll use it: Setting up camp after dark, working under the hood, running amber driving lights on a dusty trail, lighting a recovery, or just showing off a color scene at the trailhead. It's built to be used with gloves on, at a glance.
The screen, part by part
At the very top is the page title Lights with a small status word on the right that tells you the connection at a glance:
- "Connected" (green) — the panel is linked and every control is live.
- "Connecting…" — a panel is paired but not linked yet (out of range, powered off, or the truck just woke up). Controls stay dimmed until it connects.
- "No panel paired" — nothing is set up yet. The page shows a short note pointing you to Settings › Devices to pair your controller. Until then, the rest of the page is hidden.
When a panel is connected, the page is organized top to bottom:
Quick groups
A row of large, square rocker tiles — one per lighting group on your truck. Out of the box your Trail Boss comes pre-configured with three:
- Grille Bar — your main light bar.
- Cubes — the windshield/ditch cube lights.
- Amber Driving — the amber grille driving lights (five of them across the grille).
Each tile shows a little status LED, an icon, and the group name. Tap anywhere on a tile to toggle the whole group on or off. When a group is on, the tile glows warm amber so you can read the state from across the cab. Tiles are dimmed and won't respond while the panel is still connecting.
Channels
Below the groups is the full switch bank — one square switch for every individual output on your controller, laid out edge-to-edge like a real off-road rocker panel. On the stock setup that's eight switches, labeled: Grille Bar, Windshield Cubes, Spare, Amber 1, Amber 2, Amber 3, Amber 4, Amber 5 (the five amber switches run left→right across the grille, with Amber 3 in the center). Tap any switch to flip just that single light. This is where you go when you want one specific pod on instead of a whole group.
"Spare" is a labeled but unwired position — it keeps the panel numbering lined up. You can rename it (or any channel) in Settings.
Color panel
If your controller has an RGB output, this section lets you paint it any color:
- Live preview swatch — a big rounded square on the left showing the exact color currently sent to the panel.
- Preset colors — a row of one-tap swatches: red, orange, yellow, green, cyan, blue, magenta, and white. The active color gets a bright outline. Tap one to jump straight to it.
- Color bar — a full rainbow slider. Tap anywhere on it to pick that color, or drag your finger along it to sweep through hues live.
- Brightness bar — a filled bar that shows the current level as a percentage. Tap or drag to set how bright the RGB panel glows, from 0% to 100%.
- Turn panel dark — a button that instantly takes the RGB panel to black (brightness zero) without forgetting your color, so you can bring it back later.
Effects
The bottom section runs animated light shows — looping on/off patterns across your lights.
- Speed — three pills, Slow · Medium · Fast, set how quickly the pattern steps. The one in use is highlighted.
- Stop — a button that appears in the Effects header whenever an effect is running; tap it to stop everything at once.
- The effect list — effects are grouped by area (for example Bar + cubes and Amber). Each is a row with a play icon and a name. Tap a row to start it; the icon turns to a stop symbol, the row highlights, and it's marked RUNNING. Tap it again (or the Stop button) to end it.
Effects available on the stock setup include:
- Bar + cubes: Alternate (bar and cube trade off), Blink together.
- Amber grille: Sweep →, Cylon (a back-and-forth scanner), Startup build, Knight Rider, Alternate, Blink, plus static "scenes" like Odd, Inner, and Centre only.
When you stop an effect, your lights snap back to exactly how they were before it started — so kicking off a light show and then turning it off never leaves you guessing which switches were on.
How to turn a light or group on
- Open Lights from the dock.
- For a whole group (bar, cubes, or amber), tap its tile under Quick groups.
- For one specific light, tap its switch under Channels.
- A lit control glows amber. Tap again to turn it off.
How to set a color and brightness
- Scroll to Color panel.
- Tap a preset swatch for a common color, or tap/drag the rainbow bar to dial in any hue.
- Tap or drag the Brightness bar to set the level — the percentage updates as you go.
- To black it out but keep the color, tap Turn panel dark.
How to run a light show
- Scroll to Effects.
- Pick a pace with the Slow / Medium / Fast pills.
- Tap the effect you want — it starts immediately and shows RUNNING.
- Tap the same row again, or the Stop button, to end it and restore your previous lights.
How to pin a shortcut to the Dashboard
Your favorite groups already appear on the Dashboard's light row. You can also pin an effect there so it's one tap from home:
- On the Dashboard, find the light controls row and press and hold an empty "+" slot.
- A picker opens listing every effect. Tap one to pin it as an on/off button.
- On the Dashboard, tap that button to start/stop the effect; long-press it to un-pin it.
How to pair your light controller
Lights need a supported Bluetooth controller paired once:
- Go to Settings › Devices.
- Under Aux Lights, tap Find light panel. (The first time, allow the Bluetooth permission when asked.)
- Make sure the light manufacturer's own phone app is fully closed — these panels only allow one connection at a time.
- Pick your panel from the list. It connects and remembers itself, reconnecting automatically every time you start the truck.
What you need
- A supported Bluetooth aux-light controller (an AuxBeam-style switch-panel controller) wired to your lights, plus Bluetooth on the head unit. Without a paired panel, the Lights page simply shows a "pair a panel in Settings › Devices" note and no controls.
- Bluetooth permission, granted once during pairing.
- The RGB color panel only does anything if your controller has an RGB output wired up; on a plain on/off rig the color section still appears but won't change any lights.
- Your truck arrives pre-configured for the stock 8-channel layout (names, groups, and the amber driving lights set to arm on connect), so once you pair, everything is already labeled and grouped — no manual setup required.
In Settings › Devices you can also fine-tune the rig: step the channel count up or down (2–12), Rename each channel to match your lights, flip channels individually, hit All off, or Unpair the panel entirely.
Tips & good to know
- Amber auto-arms. When your panel connects (on truck start-up), the amber driving-light group comes on by itself — a nice default for daytime trail visibility. Turn it off any time with its tile or switch.
- Everything locks out until connected. While the status reads "Connecting…", all tiles, sliders, and effects are dimmed and won't respond — that's on purpose, so you never think a light changed when the panel wasn't actually linked. It'll come alive the moment it connects.
- Live two-way status. The switches reflect the panel's real state. If a light gets flipped elsewhere, the on/off you see here updates to match.
- Color changes are smoothed as you drag, so sweeping the rainbow or brightness bar looks fluid on the lights instead of stuttering.
- Stopping an effect is always safe — it restores the exact lights you had before, and if the panel drops mid-show it just stops cleanly.
- One connection at a time. These controllers only accept a single Bluetooth link, so if the manufacturer's app is open on your phone, xOverland can't connect — close that app and it'll link right up.